Welcome to the third episode of the journey to linux series,in this episode we are installing arch linux,Which is a great linux distro for customization and its very lightweight and fast.Arch installation is totally cli based which can be challenging for some people thats why i am making this episode so you
can know how to install arch manually with cli.Arch can also be installed with a script named "archinstall" it is considered the noob
way.so first lets discuss the requirements then we will get to the installation.
--------------------------------
can know how to install arch manually with cli.Arch can also be installed with a script named "archinstall" it is considered the noob
way.so first lets discuss the requirements then we will get to the installation.
--------------------------------
REQUIREMENTS
installation media:get a usb of minimum 4GB
ram: iam using 2gb but 4GB or more than that is enough for simple browsing etc
processor:64bit
storage:i am using 20gb because i am on a virtual machine but you can install it on more than 20gb
bootmode:UEFI or bios (bios is considered because installing on bios is easier then uefi)
--------------------------------
INSTALLATION
STEP1:first download the arch-linux iso from here

STEP2:download ventoy from here

STEP3: plug the usb drive
STEP4: start ventoy then select the usb drive you want to make the installation media.
STEP4: restart your pc then press the key to enter into boot menu.
STEP5: select the installation media.then select arch linux
STEP5: select start installation
STEP6: connect to the intenet

STEP2:download ventoy from here

STEP3: plug the usb drive
STEP4: start ventoy then select the usb drive you want to make the installation media.
STEP4: restart your pc then press the key to enter into boot menu.
STEP5: select the installation media.then select arch linux
STEP5: select start installation
STEP6: connect to the intenet
ETHERNET:
iplink
WIFI:
iwctl
station wlan0 connect "your wifi name" (tip: you can press tab while entering you ssid) press enter.
enter the password
exit
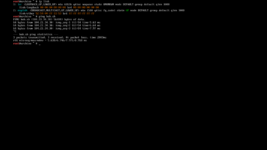
STEP7: to check if internet is working use ping hoh.sh
STEP8:now verify the boot mode by typing "cat /sys/firmware/efi/fw_platform_size"
if the command returns 64, then system is booted in UEFI mode.If the file does not exist it means you are booted in bios mode
STEP9:type "timedatectl" to update the system clock
STEP10:use "lsblk" or "fdisk -l" to verify the device name.(mine is /dev/vda yours could be /dev/sda or /dev/nvme0n1)
STEP11:type "fdisk /dev/the_disk_to_be_partitioned"
STEP12:partiton the disk
---------------------------------
BIOS:
STEP1:type "o" to create a mbr partition table
STEP2:type "n" to create a new partition
STEP2.1:type "p"
STEP2.2:type "1"
STEP2.3:press enter
STEP2.4:type "+4GB" (we are creating the swap partition, swap should be double the size of the ram meaning if ram is 2GB swap should be 4GB)
STEP3:type "n" to create a new partition
STEP3.1:type "p"
STEP3.2:type "2"
STEP3.3:press enter
STEP3.4:press enter (i am using all the remaining space for the root partition you can give space as your liking with "+16GB" you can replace 16 with the amount you want to give)
STEP4: enter "t"
STEP4.1:enter "1"
STEP4.2:enter "82"
STEP5:enter "t"
STEP5.1:enter "2"
STEP5.2:enter "83"
STEP6:enter "w" to write changes
STEP7:enter "mkfs.ext4 /dev/root_partition" (here root_partiiton for me is /dev/vda2 it could be /dev/sda2 or /dev/nvme02 for you)
STEP8:mkswap "/dev/swap_partition" (here swap_partiiton for me is /dev/vda1 it could be /dev/sda1 or /dev/nvme01 for you)
---------------------------------
UEFI:
STEP1:type "g" to create a gpt partition table
STEP2:type "n" to create a new partition
STEP2.2:type "1"
STEP2.3:press enter
STEP2.4:type "+1GB" (we are creating an EFI partition)
STEP3:type "n" to create a new partition
STEP3.1:type "2"
STEP3.2:press enter
STEP3.3:type "+4GB" (we are creating the swap partition, swap shoulkd be double the size of the ram meaning if ram is 2GB swap should be 4GB)
STEP4:type "n" to create a new partition
STEP4.1:type "3"
STEP4.2:press enter
STEP3.3:press enter (i am using all the remaining space for the root partition you can give space as your liking with "+16GB" you can replace 16 with the amount you want to give)
STEP5: enter "t"
STEP5.1:enter "1"
STEP5.2:enter "1"
STEP6:enter "t"
STEP6.1:enter "2"
STEP6.2:enter "19"
STEP7:enter "t"
STEP7.1:enter "3"
STEP7.2:enter "23"
STEP8:enter "w" to write changes
STEP9:enter "mkfs.ext4 /dev/root_partition" (here root_partiiton for me is /dev/vda3 it could be /dev/sda3 or /dev/nvme03 for you)
STEP10: enter "mkswap /dev/swap_partition" (here swap_partiiton for me is /dev/vda2 it could be /dev/sda2 or /dev/nvme02 for you)
STEP11:enter "mkfs.fat -F 32 /dev/efi_system_partition" (here efi_system_partiiton for me is /dev/vda1 it could be /dev/sda1 or /dev/nvme01 for you)
--------------------------------
STEP13:mount the partiitons:
--------------------------------
BIOS:
STEP13.1: enter "mount /dev/root_partition /mnt" (here root_partiiton for me is /dev/vda2 it could be /dev/sda2 or /dev/nvme02 for you)
STEP13.2:enter "swapon /dev/swap_partition" (here swap_partiiton for me is /dev/vda1 it could be /dev/sda1 or /dev/nvme01 for you)
--------------------------------
STEP13.2:enter "swapon /dev/swap_partition" (here swap_partiiton for me is /dev/vda1 it could be /dev/sda1 or /dev/nvme01 for you)
--------------------------------
UEFI:
STEP13.1:enter "mount /dev/root_partition /mnt" (here root_partiiton for me is /dev/vda3 it could be /dev/sda3 or /dev/nvme03 for you)
STEP13.2:enter "mount --mkdir /dev/efi_system_partition /mnt/boot" (here efi_system_partiiton for me is /dev/vda1 it could be /dev/sda1 or /dev/nvme01 for you)
STEP13.3:enter "swapon /dev/swap_partition" (here swap_partiiton for me is /dev/vda2 it could be /dev/sda2 or /dev/nvme02 for you)
--------------------------------
STEP14:enter "pacstrap -K /mnt base linux linux-firmware nano networkmanager intel-ucode man" (here intel-ucode is the cpu microcode if you have amd cpu you can type "amd-ucode" instead of "intel-ucode")
STEP15: enter "genfstab -U /mnt >> /mnt/etc/fstab" to generate an fstab file
STEP16:enter "arch-chroot /mnt" to get into the newly installed system
STEP17:enter "ln -sf /usr/share/zoneinfo/Region/City /etc/localtime" to set the timezone (here Region is name of the continent and CITY IS the name of the city)
STEP18:enter "hwclock --systohc"
STEP19:enter "nano /etc/locale-gen" and uncomment "en_US.UTF-8 UTF-8" (or you can uncomment according to your choice) to save use ctrl + S and ctrl + x
STEP20:enter "locale-gen" to generate the locale
STEP21:enter "nano /etc/locale.conf" and type "LANG=en_US.UTF-8" then save with ctrl+s and ctrl+x
STEP22:enter "nano /etc/hostname" and enter the hostname you want to create.then save with ctrl+s and ctrl+x
STEP23:enter "mkinitcpio -P"
STEP24:enter "passwd" to create a password for root
STEP25:install the bootloader:
--------------------------------
BIOS
STEP25.1:enter "pacman -S grub" then enter Y
STEP25.2: enter "grub-install --target=i386-pc /dev/sdX" (here sdX is the device where you will install the bootloader to mine is /dev/vda yours could be /dev/sda or /dev/nvme)
STEP25.3:enter "grub-mkconfig -o /boot/grub/grub.cfg" to generate the grub config
--------------------------------
STEP25.2: enter "grub-install --target=i386-pc /dev/sdX" (here sdX is the device where you will install the bootloader to mine is /dev/vda yours could be /dev/sda or /dev/nvme)
STEP25.3:enter "grub-mkconfig -o /boot/grub/grub.cfg" to generate the grub config
--------------------------------
UEFI
STEP25.1:enter "pacman -S grub efibootmgr" then enter Y
STEP25.2:enter "mkdir -p esp/EFI/arch"
STEP25.2:enter "cp -a /boot/vmlinuz-linux esp/EFI/arch/"
STEP 25.3:enter "cp -a /boot/initramfs-linux.img esp/EFI/arch/"
STEP25.4:enter "cp -a /boot/initramfs-linux-fallback.img esp/EFI/arch/"
STEP25.5:enter "mount --bind esp/EFI/arch /boot"
STEP25.6: enter "nano /etc/fstab" then add the following "esp/EFI/arch /boot none defaults,bind 0 0"
STEP25.7:grub-install --target=x86_64-efi --efi-directory=boot --bootloader-id=GRUB"
STEP25.8:enter "grub-mkconfig -o /boot/grub/grub.cfg" to generate the grub config
--------------------------------
STEP26:enter "exit"
STEP27:enter "umount -R /mnt"
STEP28: enter "reboot"
STEP29:boot the newly installed arch linux!!
STEP30:enter root then the root password.
STEP31:ARCH linux is now installed but the desktop environment is still remaining.
--------------------------------
INSTALLING DESKTOP ENVIRONMENT
STEP1:first create a user
--------------------------------
--------------------------------
CREATING A USER
STEP1:install sudo and zsh with "pacman -S sudo zsh" then enter Y
STEP2:enter "useradd -m -G wheel -s /usr/bin/zsh username"
STEP3:create a passwd with "passwd username" (my username is snake so it should be passswd snake)
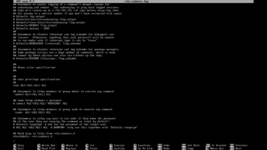
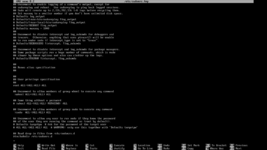
STEP4:edit the sudoers file with "EDITOR=nano visudo"
STEP4.1:enter pagedown and uncomment(remove "#") the line shown in the picture

STEP4.2:save the file with ctrl + s and ctrl + x.
--------------------------------
STEP2:change your user to the newly added user with "su username"
STEP3:now pic a desktop environment of your choice i am picking hyprland
STEP4:install hyprland,kitty and a display manager sddm with "sudo pacman -S sddm hyprland kitty" then press enter
STEP5:enter "systemctl enable --now sddm.service" to start the display manger and use the desktop environment
--------------------------------
STEP2:enter "useradd -m -G wheel -s /usr/bin/zsh username"
STEP3:create a passwd with "passwd username" (my username is snake so it should be passswd snake)
STEP4:edit the sudoers file with "EDITOR=nano visudo"
STEP4.1:enter pagedown and uncomment(remove "#") the line shown in the picture

STEP4.2:save the file with ctrl + s and ctrl + x.
--------------------------------
STEP2:change your user to the newly added user with "su username"
STEP3:now pic a desktop environment of your choice i am picking hyprland
STEP4:install hyprland,kitty and a display manager sddm with "sudo pacman -S sddm hyprland kitty" then press enter
STEP5:enter "systemctl enable --now sddm.service" to start the display manger and use the desktop environment
--------------------------------
CONCLUSION:
NOW Arch linux is installed you can test many things on it and customize it to your liking.Also now you can say
"i use arch btw"
Attachments:
-
- File size
- 167 KB
- Views
- 2
-
- File size
- 18.4 KB
- Views
- 0
-
- File size
- 807.1 KB
- Views
- 0
-
- File size
- 17.1 KB
- Views
- 0
-
- File size
- 394.9 KB
- Views
- 0
Last edited:


